Dec 22, 2009

Data Collection (MDW) in SQL Server for performance monitoring.

With Microsoft SQL Server 2008, Microsoft has incorporated new performance tool called Data Collector, also known as MDW – Management Data Warehouse and also Known as Performance Studio.
With MDW, you can collect SQL Server performance information, IO usage, disk usage, memory usage, locks, blocking, queries taking longer time, couple of performance counters etc. The useful information it collects can be preserved for long time and can be analyzed for the purpose of troubleshooting.
MDW creates it’s own database warehouse (MDW) to collect information. There are pre-configured collection sets including Server Activity, Query Statistics and Disk Usage. The data collected in MDW is published in SQL Server Management studio with very useful reports. This feature is not configured by default and can be found under Management in Object Explorer of SQL Server Management Studio.


image

As mentioned above this feature is  by default disabled, this can be enabled and configured by selecting ‘Configure Management Data Warehouse wizard’ option after right clicking on Data Collection.

image

Selecting ‘Configure Management Data Warehouse’ starts a wizard as shown below to configure data warehouse.

image

First part of configuration is to create Database Warehouse and second part is where you setup data collection.
In the following part, we are setting the database for first time, and selected option “Create or upgrade a management data warehouse”.

image

Create New database to collect information by select New option from following screen.

image


image

From the following screen, select Login and map MDW users to that Login or Logins. There are three roles for MDW, admin, writer and reader. You may either create a single Login and give admin or you may give appropriate rights to Logins, as per your requirements.

image

Review the information before clicking on Finish.

image
image

Since the database has been configured, the next part is to set the data collection. In case if MDW database has been setup on another server, this will be your first step for this server.

image

Data collector collects some information from traces and other parts which it keeps locally in a folder before pushing it to database. In the following Window you may chose directory to keep this information.

image

Review the information before clicking on Finish.

image
image

Once this process is completed, Next step is to schedule the jobs, configure the maximum retain period of collection.

image

Right click on Disk Usage, select Properties. In the property Window review and change the information like the frequency of collection, default service account to run jobs associated with current collector. You can also configure the ‘Retain data’ property and specify number of days you want to keep the information.

image

Follow the same practice for all three collector sets. Once it will configure correctly you will see reports and useful information by right clicking on Data Collection and selecting the appropriate report, as shown in following screen shot.

image

Server Activity report will look like as shown below.

image

By default it will show you data for last four hours, however you can change the date and range you want to see the reports. As shown below, click on calendar icon and select date range and number minutes/hours you want to see the report.

image

In this case, the report will be shown for data collected for 15 minutes starting 4 PM.

image

Following same way, you can view other reports as well. You may explore this feature to understand this and get used to this.
This is a great and may save money for your organization, if you are planning to buy third party monitoring tool for SQL Server.

Nov 30, 2009

Real time performance analysis of Stored Procedures

By assuming that there are no Hardware issues with SQL Server, but still SQL Server performance is not up to the mark, following query can provide some useful information for troubleshooting.

select a.*, p.query_plan , p.number
from sys.dm_exec_procedure_stats as a
cross apply sys.dm_exec_query_plan(a.plan_handle) as p
where a.object_id=object_id('[sch].[User_SP]')
There are some very useful columns returned by this query, those are:

cached_time : Recent Recompile Time
last_worker_time : Execution time in micro seconds
last_physical_reads: Number of pages read from physical storage system.
last_logical_reads: Number of pages read from buffer, instead of physical storage.
query_plan: XML representation of query plan, which was used during recent sp run.

The tables in query just keeps the last event i.e. only one record. Adding this query in job allows to store the information in temporary table and after couple of minutes you can get enough details for investigation. For single procedure, more than one query plan may exist. You may compare query plans to find out the differences.

In one of the real time scenarios, I realized that number of logical reads were few millions, for just returning 100 rows. There was issue with one of the join that caused more number of logical reads.

This is not the end, you may also compare physical reads with logical reads. Also consider frequency of procedure being recompiling. Too much recompiling may cause overhead to CPU.

Note: Logical Reads over Physical reads are good. More logical reads shows that the query is getting it’s data from buffer, more physical reads are sign of potential IO bottleneck.

Nov 9, 2009

How to enable Replication on Publisher (SQL 2008)

Introduction to Replication.

Before enabling Replication on Publisher you must decide where you want to run the distribution database. Distribution database keeps track of logs to be replicated among subscribers.
Keeping distribution database on same server as publisher may cause IO bottlenecks, depending upon hardware configuration and existing load on server.
Follow the steps to below to enable Distribution and Replication. These steps will add distribution server on selected server.
1. Open SQL Server Management Studio, Connect to SQL Server and Expand SQL Server where you wish to enable publishing and distribution.

image

2. Right click on Replication in Object Explorer, then select Configure Distribution. This will start “Configure Distribution Wizard”.

image

3. In case distribution is already setup somewhere, then select appropriate option,

image

4. In the following screenshot, notice that Snapshot Folder location is a network location. It is a good idea to keep it as network location, so that sql server agent can running on another server can access this location in case of pull subscription.

image

5. Enter the location to create data files,
image

6. From the following screen, you can add publisher server to distribution list. Click on Add button and select “Add SQL Server Publisher” to add SQL Server publisher. There is one more option available to add Oracle Publisher too. You may add more than one publisher here.

image

7. From the below screen select password for remote connection to distribution database.

image

8. From the following window, you can either select to Configure distribution, or generate the t-sql to configure distribution manually or both.

image

9. Read the summary of actions below before configuring the distribution.

image

10. Click Finish to complete the Configuration.

Oct 31, 2009

Replication on SQL Server 2008.

One of the High Availability feature of SQL Server is Replication. Replication shares the selected tables, views or procedures among other servers. In fact Replication is not fully High Availability solution, but it can helpful for reporting servers and Warehouse etc.
There are three models of Replication supported by SQL Server 2008. Transaction Replication, Merge Replication and Snapshot Replication.
Snapshot Replication This is most simplest model of Replication. Snapshot Replication just restores the initial set of data and does not support any incremental restore of logs.
Agent: Snapshot Agent, Distribution Agent
Transactional Replication This is most common replication model. Typically this Model starts with initial snapshot. Using this model, Log Reader service reads the transactions and send them over to Distribution Server. Distribution server then distributes the transactions to all subscribers. This entire process by default runs continuously, however this can be scheduled to run on specific intervals.
Agents: Snapshot Agent, Log Reader Agent, Distribution Agent.
imageFigure Courtesy SQL Server BOL: Transaction Replication
Merge Replication Merge Replication is Similar to Transaction Replication, Merge Replication also typically starts with Snapshot of initial data. Once initial snapshot is applied, it merges the changes occurred at publisher or subscriber.
Merge Replication requires UniqueIdentifier type column in each published table. If this column type is not already added, it adds this column. To track changes, Merge Replication also adds Insert, Delete and Update Triggers for each of the articles (aka Published Objects). These triggers use the UniqueIdentifier type column in each table to identify the changes, which was added above.
Agents: Snapshot Agent, Merge Agent.
imageFigure Courtesy SQL Server BOL: Transaction Replication
There can either be Push Subscription or Pull Subscription. In case of Push Subscription, Distribution Agent and Merge Agent runs at the Distributor. However, in case of Pull Subscription, Distribution Agent and Merge Agent runs at Subscriber.
Each agent of Replication is well described on BOL too. Please click here.

Enabling Distribution on SQL Server 2008.

Oct 5, 2009

Windows NT user or group 'Domain\User' not found. Check the name again. (Microsoft SQL Server, Error: 15401)

When you add new Domain Login to SQL Server, you may see error  Windows NT user or group 'Domain\User' not found. Check the name again. (Microsoft SQL Server, Error: 15401).

This error message is very general and it does not explain any specific problem or reason itself. Microsoft has a very good article to fix this issue at http://support.microsoft.com/kb/324321/en-us.

However, there is another scenario which is not covered in above article (at the time when writing this article) or may be I am the first person who faced this issue.

This scenario can be reproduced on Windows 2008 Server with SQL 2008 Server where the Domain Controller is Windows 2000 server. On Windows 2008 server, 2 new policies have been enabled by default that encrypts the secure channel data when new LOGIN request is sent to Domain Controller by Domain member(Also SQL Server). In this scenario, Domain Controller is Windows 2000, thus it does not understand the encrypted request thus refuses the LOGINrequest. All you need to do is to fix this behavior in Windows 2008 (SQL Server) to not to send encrypted secure channel data to Domain Controller. To do this follow the steps below and it should fix the issue.
  1. From the SQL Server running Windows 2008 R2, Click Start-> Run and type the command GPEDIT.MSC. This will open the Policy Editor.
  2. From Policy Editor Expand “Computer configuration” - > Windows Settings -> Security Setttings -> Local Policies -> Security Options.
  3. You will see all security policies on right hand side window. Make changes into the following two policies.
    • Domain member: Digitally encrypt secure channel data (when possible) – Disable this policy
    • Domain member: Digitally sign secure channel data (when possible) – Disable this policy
After making these changes, close the policy editor and reboot the box. (Not SQL Server, but restart entire system).

In case your local policy does not allow you to make changes, you may have to make changes using Group Policy Management Console. Instructions to install GPMC are located at http://blogs.technet.com/askds/archive/2008/07/07/installing-gpmc-on-windows-server-2008-and-windows-vista-service-pack-1.aspx.

  • Run gpmc.msc (Group Policy Management)
  • Expand your Domain
  • Go to and select and then follow steps 2 and 3 from above.

Sep 25, 2009

SQL Server Virtualization

Introduction

When I first heard SQL Server Virtualization, I made an assumption that it is a new feature of SQL Server that provides Virtualization at SQL Server Level, that is not the case. SQL Server Virtualization is nothing but running SQL Server Instance on Virtual Machine. SQL Server Virtualization is one of the hottest topics these days, especially after Microsoft has launched Microsoft Hyper-V (AKA Microsoft Hyper-Visor) and VMware ESX Server. In more technical terms Virtual Machines are also known as Hyper-Visors. As far as SQL Server is concerned, there is nothing specific you need to configure on SQL Server for Virtualization. The only configurations are made using Virtualization Software and sometimes system BIOS. The Original HyperVisor was developed at IBM in the 1960s called CP/CMS.

Type of Virtual Machine Or HyperVisor or Virtual Machine Monitors or Virtualizations:

  • Type 1: Hosted. 

  • Type 2: Native or Bare-Metal.


Type 1 hypervisors are the common virtual machine monitors mostly used. In this scenario, Virtual Machine Monitor or VM tool is installed or Hosted on Operating System. This is why it is called Hosted Virtualization too. Thus Virtual Machine Communicates with Operating System for all of its resources Requirements. VMware Server, Microsoft Virtual PC are some of the famous Virtual Machine Monitors. Following is the basic architecture of Hosted Virtualization.
 
Type 2 hypervisors run on host's hardware and communicates directly with the Hardware instead of communicating with hardware through Host OS. The hardware resources and I/O are shared among virtualized OSs. That is why it is also called Bare-Metal Virtualization. It is also possible to assign specific devices to specific Virtualized OS, this is called partitioning. VMware ESX Server, Microsoft Hyper-V, Citrix Xen, LynuxWorks  are some of the software available in market. Following is a basic architecture of Bare Metal Virtualization. 


Why or Why not use SQL Virtualization.

When Total Cost of Ownership is your concern then Virtualization is the answer. Since virtualization runs on single set of hardware, thus the cost of buying new hardware can be reduced. Also need to consider that the performance of Virtualization will not be as good as running individual machine, because SQL Virtualization does not only includes SQL Server, it also includes Operating System, and other required tools for OS and SQL Server. There can be three priorities of an organization, Performance, Integrity, Cost. If Performance is only concern then avoid using virtualization because at some point you may notice lack of enough resources to run environments in virtualization. If integrity or cost is the concern then one may consider virtualization.


Conclusion

Virtualization is a nice technology and can save hundred thousand of dollars for organization, though there is downside too. If planned wisely, the downsides can be avoided.
The best ever plan for most of the organizations can be consider deploying SQL Virtualization on Development, UAT or any non-production environment and avoid deploying SQL Virtualization on production environment as much as possible unless you have one of the best hardware that can give good performance even if multiple OS are installed with SQL Server.
Installing multiple instances on same Operating System should also be considered while planning for SQL virtualization.

Send Email when No Rows are transferred in Data Flow Task of SSIS - SQL 2008

There might be some situations when user must be notified that NO RECORD was transferred to destination while executing SSIS Package. There is no one way of doing this, however, I find the following as the most simple and less complicated way. The steps are:

1. Declare a variable at project Scope level in SSIS.


2. Open the Data Flow task where the 0 row count needs to be validated. Add Row Count task between Source and Destination, and assign row count result to a variable that was declared above. Look at the following two images:


3. Go back to control Flow Tab, Just below the Data Flow task, that was modified above, add a Precedence Constraint and join it to Send Mail Task, add another Precedence Constraint and Join it to the task that should be executed next. At this point, under the same Data Flow Task, there will be two Precedence Constraints with Green Color (Success). Next, condition needs to be added to these Precedence Constraints, so that in case there is no record an email should be sent to the user.

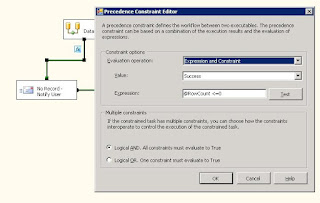
4. Remember that already a variable has been set above with Row Count, same variable will be used here to decide whether there was any row returned or not. Configure the Precedence Constraint just similar to what is shown in figure below. Doing this, it will make sure that email will be sent only if RowCount is 0.


5. Configure second Precedent Constraint, that was added later so that step next to is executed if RowCount is greater than 0. Similar the screen below:


6. Once these steps are completed, you will notice 'fx' icon next to each of the Precedent Constraint.
7. Next, Set the Precedent Constraint between Email Task and the task that should be executed when more than 0 records are transformed. This step should be ignored, if SSIS has not to proceed further if 0 rows are returned.

After completing all the steps, the Control Flow Task will appear like:


Sep 21, 2009

Red Gate SQL Backup 5.4 vs SQL Server 2008 Backup


RedGate 5.4 Backup Vs SQL 2008 Backup Vs SQL 2008 Backup with Encryption

RedGate 5.4 Encrypted Compressed Backup

How it works?

1. Backup the database,
2. Compress the Database,
3. Encrypt the Database with a Password,
4. Password needs to be supplied while restoring/backing up the database, or password needs to be place in script in job.

Database size for testing

7 GB

Backup Time

                134 Secs

Backup Size

                715 MB

Restore Time

                247 Seconds.

Encryption

                Yes, 256 Bit.

Compression Level

                3 - Full (Available options, 1, 2, 3)

Advantages

1. Encrypts the Backup file, not the database.
2. Flexible Compression levels can be used.
3. Compression Ratio is large than SQL Compression.
4. Backup can be split into multiple files.

Limitations

                1. Requires to buy another License.
2. Password is displayed on backup/restore script, anyone can see the password, who has access to view the jobs.

Tested Script

DECLARE @exitcode int
DECLARE @sqlerrorcode int
exec master..sqlbackup N'-SQL "BACKUP DATABASES [myDB]  TO DISK = ''C:\SQL Data\backup\'' WITH NAME = '''', DESCRIPTION = '''', ERASEFILES = 5, COMPRESSION = 1, THREADS = 1,MAILTO = ''DBATeam@Domain.com''"', @exitcode OUTPUT, @sqlerrorcode OUTPUT
IF (@exitcode <>0) OR (@sqlerrorcode <> 0)
BEGIN
  RAISERROR ('SQL Backup job failed with exitcode: %d  SQL error code: %d', 16, 1, @exitcode, @sqlerrorcode
END

SQL 2008 Ent Full Backup Compressed

How it works?

1. Backup the Database,
2. Compress the Database,
3. Password Protection is available, however without encryption. Open URL below for more information - http://www.mssqltips.com/tip.asp?tip=1108

Database size for testing

7 GB

Backup Time

120 Seconds

Backup Size

865 MB

Restore Time

246 Seconds

Encryption

No.

Compression Level

Full, Only Option

Advantages

1. No Need to purchase extra License, this is part of SQL 2008 License.

2. Password protection is available to backups.

3. Supported by Microsoft as part of Microsoft Product.

4. Compresses the Database.

Limitations

1. Does not support Encryption.

Tested Script

BACKUP DATABASE MyDB TO DISK= 'C:\SQL Data\backup\myDB.bak'
WITH COMPRESSION
GO

RESTORE DATABASE  MyDB FROM DISK = 'C:\SQL Data\backup\myDB.bak'
WITH RECOVERY,
MOVe 'DATA1' TO 'C:\SQL Data\Test\DATA1.mdf',
Move 'LOG1' TO 'C:\SQL Data\Test\LOG1.ldf',
Move 'INDEX1' To 'C:\SQL Data\Test\INDEX1.mdf'
GO

SQL 2008 Ent Full Backup Encrypted Compressed

How it works?

1. SQL 2008 supports Encryption at database level and encryption has to be enabled first time using the following steps.

     a. A database certificate has

          to be created followed by a Master Key.

     b. Using certificate, Database Encryption Key

          can be created to make database encrypted.

     c. Encryption can be enabled on database at

         this point (CPU Intensive task).

2. Backup the Encrypted Database.

3. Compresses the database.

Database size for testing

7 GB

Backup Time

218 Seconds

Backup Size

                4.73 GB

Restore Time

                337 Seconds

Encryption

                Yes, 256 bit.

Compression Level

                Full, Only Option

Advantages

1. No need to display the password on restore command or backup command. SQL Server uses the inbuilt database certificate for security.

2. No Need to purchase extra License, this is part of SQL 2008 License.

Limitations

1. CPU Intensive Task.

2. Backup Compression ratio least of other two option.

3. In case certificate is lost, we can lose the Data.

Tested Script


--1. CREATE MASTER ENCRYPTION KEY
CREATE MASTER KEY ENCRYPTION BY PASSWORD = '*****'


--2. CREATE DATABASE CERTIFICATE
CREATE CERTIFICATE dbCERT WITH SUBJECT = 'Database Certificate TDE'

--3. BACKUP CERTIFICATE
BACKUP CERTIFICATE dbCERT TO FILE = 'C:\SQL Data\DB CERTIFICATE\db_bkupcert_1.cert'
WITH PRIVATE KEY(
 FILE = 'C:\SQL Data\DB CERTIFICATE\db_bkupcert_1.cert', ENCRYPTION BY PASSWORD = '*****');

--4. CREATE DEK -- DATABASE ENCRYPTION KEY
CREATE DATABASE ENCRYPTION KEY
WITH ALGORITHM = AES_256
ENCRYPTION BY SERVER CERTIFICATE dbCERT


--5. ENABLE ENCRYPTION ON SELECTED DATABASE
ALTER DATABASE myDB SET ENCRYPTION ON

--6. ABOVE COMMAND WILL START A BACKUP PROCESS OF ENCRYPTING DATABASE, MONITOR THE STATUS OF ENCRYPTION PROCESS USING
--FOLLOWING COMMAND.

SELECT db_name(database_id), encryption_state,percent_complete
FROM sys.dm_database_encryption_keys

Sep 8, 2009

Improving database performance with Table Partitioning


Table Partitioning is new concept introduced in MS SQL 2005. Partitioning is concept of taking performance benefit from SQL server by splitting the tables in multiple parts, on the basis of values in pre-defined column. However in old days of sql (6.5-2000), good developers knew how to take benefit from sql by splitting tables. They used to create multiple tables instead of one table and writing check constraint to group data in tables. Let me try to explain you this concept using following example:


create table Sales_1
(
SKU varchar(20),
SaleDate datetime
)

alter table Sales_1
ADD CONSTRAINT sales_date_1 check(SaleDate < '2009-01-01')

create table sales_2 (
SKU varchar(20)
SaleDate datetime
)

alter table Sales_2 ADD CONSTRAINT sales_date_1 check (saledate >= '2009-01-01')

We have two tables, sales_1 and sales_2, on each table we have setup the check constraint. On one of the tables we added constraint to keep the records prior to 2009 and in other table we are keeping records where sales belong to 2009.


create view sales
as
select * from sales_1
union all
select * from sales_2

We created a view sales, in which we used union to get combine the rows from both of the tables. If you query data for date prior to 2009, it will hit only sales_1 table, and otherwise it will hit sales_2. This approach is when we think of archiving data, since in this case, we almost archived our prior to 2009 data and that table will not get hit, unless we write query to do that.

The only limitation to this approach was to inserting rows using views.

In sql 2005, it is quite easy and systematic approach to achieve the same thing, but using Table Partitioning. By default sql creates one partition for each table in database, however more than one partitions can be added to tables. Logically speaking partitioning is a horizontal split of rows. Each set of rows will be saved into certain partition that matches the value in specified column on the basis of certain rule.

Let's say, In your database you have data for ten years with million of rows, and you can split the data (rows) into ten different partitions and each partition belongs to each year. Thus it logically makes it well organized and also boosts the performance. This is importance to know that to get performance benefit, partitioning should be applied to large tables, where performance is generally poor, while selecting and storing data.

Well, once partitioning is in place, you don't need to worry about putting data into selective partitions, or while selecting data you don't need to worry about writing more than one queries. It would be SQL's duty to take care of partitioning rules.

Prior to creating partition on tables, two things needs to be followed, First creating function and second creating a scheme on basis of function. Once partition function and scheme are in place, last step will be to create table on the basis of function and scheme.

Partition Function


In simple terms, a partition function defines the logical boundary for the data. Let's take the same example as I took for partitioned view. I want to distribute the sales information of year 2008-2009 in first partition, 2009-2010 in second partition. To do this, first I need to decide which data type need to be considered to partition. Of-course in this case, it will be datetime datatype. One thing needs to be understand here that Partition Functions are independent of any tables. Partition functions can be referenced by any table.


Now I know that I have to make the groups or boundaries, i.e. 2008-1-1 to 2008-12-31, then 2009-1-1 to 2009-12-31. There are two type of partition functions, Left Range Functions and Right Range Functions.


Left Range

Data equivalent to the boundary will move into the Left Partition. If left boundary is defined as the first boundary in the range then all data equivalent to the boundary or less than the boundary will move into the first partition. If we create a Left Range Function with boundaries of 2008-12-31, and 2009-12-31, then it creates three partitions. Partition 1 - values equal to 2008-12-31 or less than this. Partition 2 - values equal to 2009-12-31 and greater than 2008-12-31. Any value greater than 2009-12-31 will go into partition 3.


CREATE PARTITION FUNCTION part_sales(DATETIME)
AS RANGE LEFT FOR VALUES
('2008-12-31','2009-12-31')
GO


Right Range

The only difference between Left Range and Right Range is that using Right Range data equal to the boundary will move into the next partition. To accomplish the same result as Left Range, the Right Range can be defined in following way.


CREATE PARTITION FUNCTION part_sales(DATETIME)
AS RANGE RIGHT FOR VALUES
('2008-1-1', '2009-1-1')
GO


Partition Schemes

This is not all. Once partition function is created, next step is to decide in to which file group partitioned data should go. In the function we created three different boundaries and to gain highest performance out of the partition function, we need to create three different file groups. Let's assume that I have created three different file groups, fg1, fg2 and fg3 on three different storage arrays. Partition scheme decides which file group the data should go for each partition.


CREATE PARTITION SCHEME ps_Sales
AS PARTITION part_sales
TO(fg1,fg2,fg3)
GO


Partition Table

Once the partition function and partition schemes are created, next step is to create the partition table. A partition table must be created with non clustered primary key. The clustered index while adding to the table, will partition the table on the basis of partition scheme.

CREATE TABLE sales(
order_id INT NOT NULL PRIMARY KEY NONCLUSTERED,
productID int NOT NULL,
Qty INT NOT NULL,
Sale_agent VARCHAR(50) NOT NULL,
Sale_Final_Date datetime NOT NULL
)

CREATE CLUSTERED INDEX idx_Sales_Date
ON sales(sale_final_date)
ON ps_Sales(sale_final_date);


When you query the partition table, no special query is required. Query Optimizer it self choses the right partition to display the results.

I will write more blogs on partitioning that will show how to edit the partition, removing partition etc.

Aug 31, 2009

Decrypting the encrypted DTS command to readable text.

Copy and paste the DTSRUN script including DTSRUN to command line window (aka cmd), add switches /!X and /!C at the end of the DTSRUN command. Press enter.

Result has been copied to clipboard, just paste it to notepad.

/!X does not execute the command, and /!C copies the result on clipboard.

Aug 26, 2009

Moving data or log files to another location without detaching database.

There are various ways you can move the datafiles or logfiles to new location, However, I am going to share the method I used because I don't need to detach the database and reattach the database using this method. This method saves lot of maintenance time, in case if your database is replicated or it is required to be present 24/7. However, there will be performance fallback while performing any of these methods.


The only limitation using this method of moving files is that the primary data file and primary log file can not be moved while online, however the primary files can be marked as Empty File and sql server will transfer all data to new file and sql server will not put data in files marked as empty files anymore.

It has to be done in the following sequence:

  1. Add new files to database to new location.
  2. Transfer data from old file to new files and marking file as not to be used for storing any data.
  3. Remove old files (except primary data or primary log file). Though primary data or log file will not be used for storing data in future and all existing data will be moved to new file in same filegroup.

Here are the details you can follow against each step I mentioned above:-

1. Add new files to database to new location.

Assuming that you have database named TESTING and you have a file group named SECONDARY. Just make sure that you add new file to one of the existing FILEGROUPS (In my case it is SECONDARY), It is required because the existing data will be moved to existing FILEGROUPS when you mark the database as EMPTYFILE. Run the following script, edit the parameters as per your requirements.

ALTER DATABASE testing
ADD FILE ---- for adding log file just change this line to ADD LOG FILE
(NAME = 'data_5'
, FILENAME = 'C:\Program Files\Microsoft SQL Server\MSSQL\data\data_5_Data.NDF'
, SIZE =5MB, MAXSIZE = UNLIMITED, FILEGROWTH = 10MB)
TO FILEGROUP secondary

2. Move data from existing file to another file and mark file as EMPTYFILE so that you could remove the file later.

DBCC SHRINKFILE(data_3, EMPTYFILE)
GO

Once you mark the file as EMPTYFILE, you may delete the file from list, or you can keep the file if the file is Primary file, however, the file now is empty (no pages) and sql will not store any data in this file.

3. This is the final step. Remove the file you just marked as EMPTYFILE

ALTER DATABASE TESTING
REMOVE FILE data_3
GO


Thanks
Swarndeep

Aug 25, 2009

SQL 2000: Database in suspect mode.

Database can go into suspect mode for a couple of reasons, including, corruption in data files, indexes, logs, bad storage, less space available on storage for the database files to grow. Following is one of the ways to fix the suspect databases. I followed this process on one of the production user databases.
Please read through before taking any action.
First you need to put your database into Emergency mode so that database can be accessed (though read only).

sp_configure 'allow updates', 1
Reconfigure with override
GO -- This will make system table editable.
--
update master..sysdatabases set status = status | 32768
where name = 'db'
GO --puts database into emergency mode
--

Once database is in emergency mode, try running the DBCC CHECKDB to check the database. If DBCC shows any error message, fix the error.

In case DBCC reports Log error, you may rebuild the log, however rebuilding the log will remove the t-log data:
DBCC REBUILD_LOG('db','c:\mssql\data\db.ldf')
--

In case of corrupted index, try creating the infected index again, you may try Create Index ... DROP_EXISTING
--

If nothing helps, you may run DBCC CHECKDB('DB',REPAIR_ALLOW_DATA_LOSS), however, this may certainly result in some data loss.

Once you have completed all the activities and database is fixed, you may run the following script to set database to normal mode.

update master..sysdatabases set status = 0 (Or the original value)
where name = 'db'
GO --puts database back into normal mode.
--

Sp_configure 'allow updates', 0
Reconfigure with override
GO -- This will make system tables un-editable.
--

Swarndeep

Optimizing Indexes with Execution Plans

Contact Me

Name

Email *

Message *