Sep 15, 2019
Mar 16, 2019
Using Azure Storage for SQL Backups
you may have taken backups on local storage, file servers, NAS, etc. Now a days it is becoming crucial you have backup copies available in different locations just in case disaster strikes and you need your large backup readily available on other coast.
Cloud Storage probably is the best option you can have without having data centers offsite availability for BCP.
As I have been reviewing Azure for some time now, I find it very simple and intuitive taking backups on Azure Storage.
Some of the storage objects provided by Azure are Blob, Table, Queue and File. Not only
Azure Storage is highly available from anywhere in the world also it secured
and durable.
By default, the data
in Storage Account is secured with Encryption at server-side (using Transparent
Data Encryption).
Data from Azure
Storage can be accessed via URLs (http and https). The
URL (also called end points) are fixed for each object type and can be
referenced by prefixing unique storage account name. Here are the URLs for various object types:
Blob:
blob.core.windows.net
Table:
table.core.windows.net
Queue: queue.core.windows.net
File:
file.core.windows.net
For example, if my
blob storage account name is “mystorage” then the URL will become
http://mystorage.blob.core.windows.net/
In order to
understand Azure Storage, I would like to give one End to End demo on Azure
Storage. The demo will include creating Storage Blob and then taking backup directly on the Storage Blob.
At high level these
are the steps we need to take:
Setup Storage
- Create Resource Group
- Create Storage Account
- Create Storage Context
- Create Storage Container
- Create Access Policy
- Create Shared Access Signature (SAS)
Preparing for SQL Backup
Final Steps (SQL backup
on Azure Storage)
- Take Backup on Azure Storage using connected Azure Storage (URL)
- Verify Backup on Storage
Setup Storage
- Connect to PowerShell (Elevated)
- Install and connect to Az (Azure Module)
Install-module az -AllowCobbler
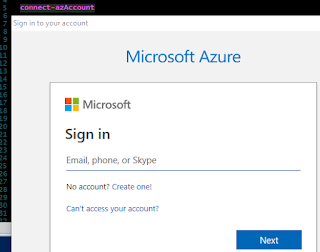
Connect-azAccount
- Complete the Sign in Process as prompted
- Setup a few variables
$resourcegroup = '1209rg'
$storageaccount='1209sa'
$container='1209con'
$policyname='1209policy'
- Get the Subscription ID#Get SubscriptionID
$subscription=Get-AZSubscription
$subscriptionid=$subscription.ID
- Switch the context to Subscription as selected above
# Change the context to subscription ID for
further work
Set-AzContext -SubscriptionId $subscriptionid
- Create
new resource group (read more about resource groups here: https://tinyurl.com/y8k3jqoj)
# create new resource group for
New-AzResourceGroup -Name $resourcegroup -Location 'East
US'
- Create a new Storage Account
·
You may read more about storage accounts at https://azure.microsoft.com/en-us/pricing/details/storage/page-blobs/
·
For creating storage account, you need to provide Resource
Group name, Location and Type of storage
·
For more information on storage types, visit this page:
https://docs.microsoft.com/en-us/azure/storage/common/storage-account-overview
# Create new Storage Account
New-AzStorageAccount -Name $storageaccount -ResourceGroupName $resourcegroup -Location 'East
US' -Type Standard_LRS
- Getting
Access Keys
o After creating
storage account, azure will be default create two new access keys and these
keys are secret passcode to access the storage remotely using http or https URL
$accesskey = (Get-AzStorageAccountKey -ResourceGroupName $resourcegroup -Name $storageaccount).Value[0]
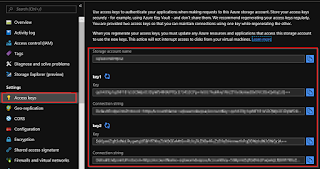
o Access keys can be
validated from Portal as well
- Creating
Storage Context
o Storage context is a
reference to storage by taking storage account name and access key
$storagecontext=New-AzureStorageContext -StorageAccountName $storageaccount -StorageAccountKey $accesskey
- Creating
Storage Container
- Storage
container can be thought of as a parent folder within Storage Account and
holds the data
$storagecontainer = New-AzureStorageContainer -Name $container -Context $storagecontext
·
Creating
Access Policy
o
Access
Policy can be considered as a group policy for containers and Shared Access
Signatures Token can be created with policy as defined in Access Policy and
makes it easy to manage, revoke and restrict access. SAS without Access
Policies can be difficult to manage. In order to revoke access from SAS without
a policy, the access key would need to be changed.
$policy=New-AzureStorageContainerStoredAccessPolicy -Container $container -Policy $policyname -Context $storagecontext -StartTime $(Get-Date).ToUniversalTime().AddMinutes(-5) -ExpiryTime $(Get-Date).ToUniversalTime().AddYears(1) -Permission rwld
·
Creating
shared access key and getting container object
o
A
shared access key is required for creating credentials and container object is
required to get URL from container
# get blob container
$cbc = $storagecontainer.CloudBlobContainer
o
Following
script will copy the script in clipboard
# Create credentials
$tSql = "CREATE
CREDENTIAL [{0}] WITH IDENTITY='Shared Access Signature', SECRET='{1}'" -f $cbc.Uri,$sharedaccesstoken.Substring(1)
$tSql | clip
Preparation of SQL
Backups
·
Create
Credentials
o
In
the previous step we generated CREATE CREDENTIAL script and stored in Clip,
paste the content from clip to SSMS where you wan to run the backup process
CREATE CREDENTIAL
[https://1209sa.blob.core.windows.net/1209con] WITH IDENTITY='Shared Access
Signature',
SECRET='sv=2017-07-29&sr=c&si=1209policy&sig=XbRBSAQiwkHds2a5vOBR8sM0rKpAQJkLbI3D'
o
To
verify expand the Credentials from Security as you can see below:
·
Now
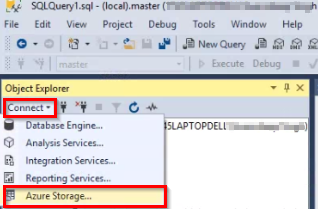
add Azure Storage Account in SSMS
o
SSMS->
Connect-> Azure Storage
o
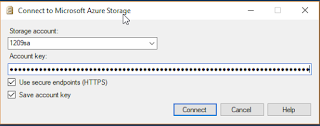
Enter
Storage Account Name and Access Key as got from previous steps (or you may get
it from Portal too)
o
Getting
from Portal
Final Backups to Azure
Storage
·
Backups
o
Backup
on Azure Storage is just slightly different from traditional backups on file
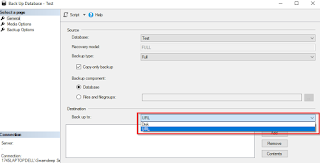
system or tape. When taking backups on Azure, you need to select URL as
destination instead of file or tape:
o
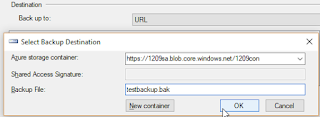
The
Dialog box for Selecting Backup Destination would let you select the storage
container that added in previous steps
o
T-SQL for taking backup on Azure Storage Container is copied below:
T-SQL for taking backup on Azure Storage Container is copied below:
BACKUP DATABASE [Test] TO
URL = N'https://1209sa.blob.core.windows.net/1209con/testbackup.bak'
STATS = 10
GO
o
If
the command completes successfully you should have your backup posted on Azure
Container
·
Verify
Backup
o
You
can verify the backup file from either SSMS->Storage Container or from
Portal itself
o
From
Portal, Navigate to Resources-> Storage Resource-> Blob-> Container
o
From
SSMS, Expand Storage Account-> Containers-> Container
Conclusion
You now have your
backup on Azure Cloud and you can restore it from anywhere where there is
internet to connect to cloud. You can restore backups to On-Premises and IaaS
(SQL running on Azure VM). The process to restore is same, you have to follow
the process of creating credentials and adding existing storage to SSMS.
Jan 28, 2019
Demo - Azure Logic App and Integration Service
What is Azure Integration Service
In modern technology, it has been becoming a common
requirement to have integration between various business processes (services or applications). Often times Solution providers give solutions by embedding
integration within the code like C#, Java etc. Developers have to ensure that besides
integrations, there should be some kind of communication between services, monitoring and security. A good
example could be that an ERP or Order System may be integrated with one of the vendor application.
This entire process looks very simple to develop, though it may not be that simple to implement as developing a solution from scratch need planning, coding, triage, testing
and eventually time and money.
Many of the application vendors now days expose APIs for data and services, hence making it available to integrate their business processes for data and service utilization. The purpose of Integration Service is to take advantage of APIs and integrate processes.
Azure Integration service does exactly the same thing. With Azure Integration, APIs (Rest\SOAP), Service Buses (Messaging Queue) or Events can be utilized to setup Business Workflow using Logic Apps, hence integrating applications. The process and implementation can be broken down to following technologies:
- Logic Apps
- APIs Management
- Service Bus
- Event Grid
- Data Gateway
- On-Premises Application
Logic Apps
Logic Apps are required to implement the business process or
you may call it process work flow with series of actions. Think of CRM system,
with any update in CRM you may want to send an email or you may want to access
on-premises SQL Server and update it. You may define system to system process,
user to system process, etc. Please note that Logic App is server-less implementation
(platform) i.e. you don’t need to have VM (infrastructure).
API Management
Most of the modern application vendors expose few of their
APIs externally (REST and SOAP) so that external applications can utilize its
data or services through these APIs. These APIs can be made available though
API Management extension in Azure Portal.
Service Bus
Service Bus is a trigger and important part of application
integration. One way to setup communication between applications is APIs, also
called Synchronous method of communication and in cases where APIs cannot made
available asynchronous approach may be required. This asynchronous way of
communication is called Service Bus. Service Bus essentially an MSMQ type of
service.
Event Grid
Event Grid is also a trigger. Instead of setting
up polling for application to check whether any new message has been received,
can be not too useful. Rather receiver can be notified via an event. An event
can be setup to monitor the queue and if a message is arrived then event can
invoke event handler.
Data Gateway
Data Gateway is a tool installed on individual host on-premises to connect on-premises service or application with Azure Integration Service, also called hybrid solution.
On-Premises Application
On-Premises Application is part of the business process that needs to be integrated, it could be BizTalk server connecting to other sources on Azure using Logic App.
Picture below shows high level architecture of Azure Integration Services
There can be different scenarios where APIs, Events Or Service Buses can be used to integrate. I would like to give a quick demo on how Azure and SQL Database can be integrated. The purpose of the Demo is to create Logic App that continuously monitors if a new file gets added to Drop Box, an entry should be made into Azure SQL Database.
This demo would require following prerequisites:
- A Drop Box Account
- Azure SQL Database
- Connection String of Azure SQL Database
First create a Drop Box Account if you don't have already.
This is common scenario hence I am skipping demo of creating Drop Box Account.
Create Azure SQL Database
- If you already have Azure SQL Database then you can skip this step
- Login to portal.azure.com
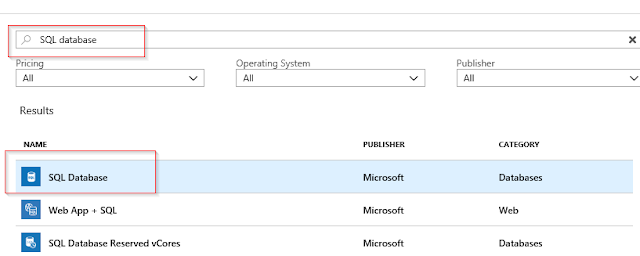
- Click on create resource, search for SQL Database resource
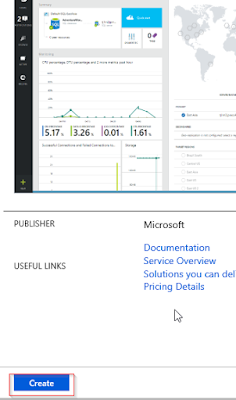
- After selecting SQL Database resource, click on Create
- Enter SQL Database Details and click on create to submit deployment request
Modify Firewall Settings from Azure SQL Database
- Once Database gets created, you need to modify database firewall and add client IP of your network so that you could connect to database using SSMS on your machine.
Get Connection Details of SQL Database and create table to save new file record
- Now get the connection details of newly created database. For this go to resources and select Database resource, it should open properties and from there you can get Connection details.
- Once you connect to this database from SSMS, create table in this database with following specs
- At this time you will have to start creating the Logic App. Select Logic App resource from resources and click on create.
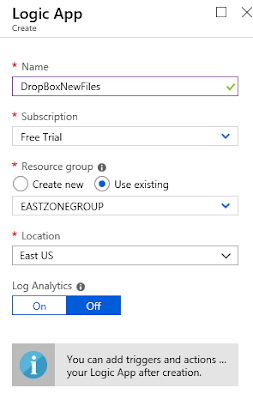
- Enter basic details of Logic App like Name, Subscription, Group and Location and submit the deployment request
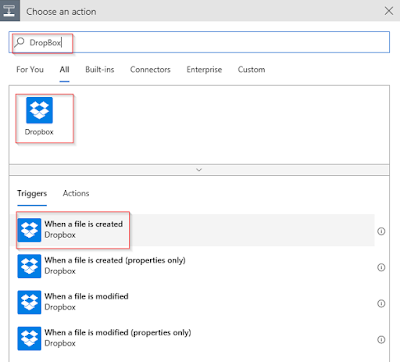
- This should open Logic App Designer. From Designer under choose action, search for DropBox and under Triggers, select When a file is created
- It should ask you to authenticate your dropbox account and also select the root folder.
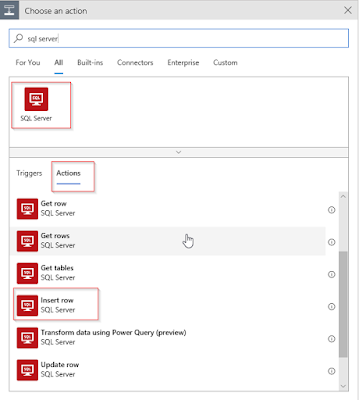
- After completing dropbox configuration, add new step for SQL Server
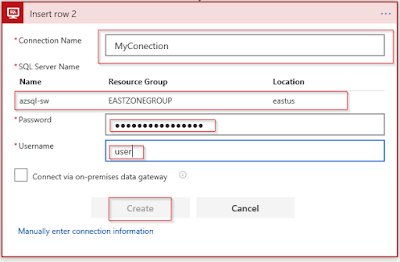
- Add SQL Server connection details
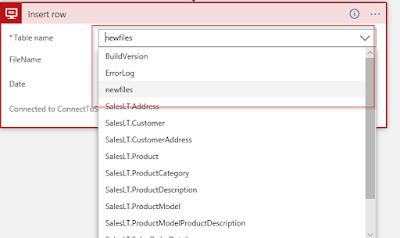
- Next select the table name that was created earlier
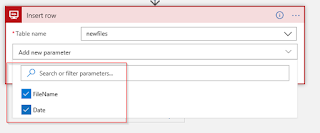
- Next, select parameters FileName and Date.
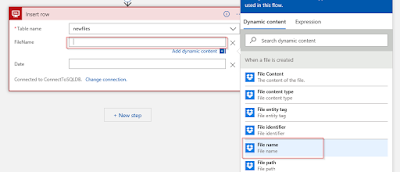
- Enter parameter details
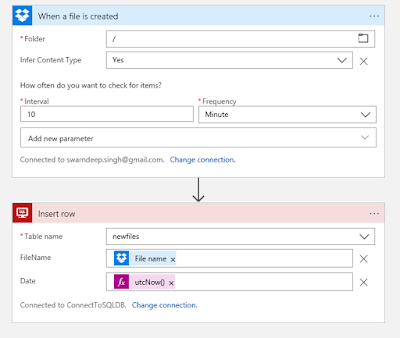
- It should be all set, finally review all configurations
- Add a file to root folder
- Execute the Logic App manually, it should execute anyways as per schedule as well
- Now if you go back to SQL and look at the table content it should have new file names and date new file was observed as per UTC time.
This is all, you now have Azure Logic App monitoring your drop box and adding an entry in SQL if there is a new file found.
Subscribe to:
Posts (Atom)
-
DISCLAIMER: ANONYMOUS ACCESS IS NOT RECOMMENDED as it may give direct access to your report server or report objects to any one who knows th...
-
With Microsoft SQL Server 2008, Microsoft has incorporated new performance tool called Data Collector, also known as MDW – Management Data W...
-
What is TDE ? Transparent Data Encryption (TDE) is used by Microsoft, Oracle, and other Database provider companies to encrypt data f...
